Air Combat Manoeuvres
Continued part 1...
Introduction
(Thanks to Gutted of
JG52
for this great information)
The R�tte is the smallest and
most basic form of the entire system. Understanding the r�tte is critical,
because higher levels of organization and tactics are layered on top of it.
The r�tte consists of two aircraft. One leader, and one wingman. During the
course of the mission, they may swap roles... but at any one time there is
one leader and one wingman. Often times, one will be a 'mission-wide' lead,
with temporary control being given to the wingman at certain times during
the mission... and this is highly encouraged.
To be honest, if a leader
doesn't temporarily swap roles with his wingman enough he is scoffed
at. No one wants to sit in the backseat all the time watching the driver
have all the fun. If you are leading, and you get a quick bounce-kill on a
lone enemy.. consider handing your wingman the lead for a short time while
you cover him for the next one. Basically, to make flying in this manner
worthwhile.. the two of you should have equal opportunity. The buck doesn't
stop there though. When we get to offensive tactics, you'll really begin to
see why having two planes are better than one... and why being a wingman is
not as bad as it sounds. Before we get there though, we need to talk about
how a r�tte flying by itself should cruise around the battlefield.. so as to
not become a fiery mess before they ever get to employ those tactics..
Formations
It's a dangerous sky we fly
in. In a matter of seconds you can go from cruising giggling with your
wingman, to having him going down screaming in a ball of flames. We fly
together for mutual protection and to have more eyeballs scanning the sky
looking for danger. Unless the proper formations are flown though, you
aren't allowing yourself any of the benefits of flying as a pair. Lets have
a look at the problem at hand:
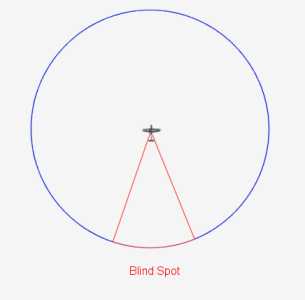
Flying along you by yourself you are very
vulnerable. As you can see from above you have a nasty blind spot behind
you. Also, you cant see what's under you, below your nose, or what's under
your wings. To keep this airspace under surveillance you'd have to roll and
do small check turns and look all over the place. You can't possible keep
the air around you completely covered at all times. Bad guys can and will
sneak in on you to ruin your day. That's why having another set of eyeballs
is so important. But, it does no good if that wingman doesn't form
on you in a manner that helps.
There are three basic formations a r�tte
can be in: Line Astern (or Trail), Echelon (Wedge),
or Line Abreast (Wall). We'll run down them and see what
each have to offer:
Line Astern
/ Trail

The all too common 'follow the leader' formation..... also called "Idiot File" by the
Germans in WWII. There's so many things wrong with this that it's not
funny. Yet, in our virtual skies you see it allot. The leader cannot see
the wingman's six, and in the position the wingman is in.. he's only
watching what is immediately between the two of them.. The wingman may
as well just be sitting in the leader's plane with him, because this
formation does absolutely no good in terms of lookout. Here's what each
pilot can see in this formation:
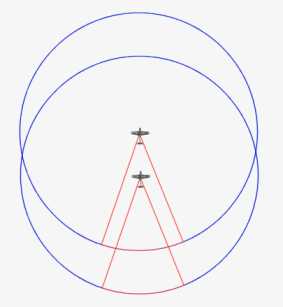
To make the situation even more
dreadful is that if an enemy were to sneak in on these two guys, he can
take them both out in a single pass. I've seen it done to
people, and I've done it to others. For fighters on patrol, this is
suicide.
Echelon
/ Wedge
The wedge is basically just an echelon
(staggered formation) with just two planes. Add in more than two
aircraft and you'll call it an echelon. The wingman is still behind the
leader here, but he's offset to the side ~45 to 60 degrees with decent
spacing so the lead can clearly see him.. With just a quick turn of the
head, the lead should be able to quickly and easily see the wingman in
this formation. If he can't you aren't position right. There are still
some gaps however, as seen below:
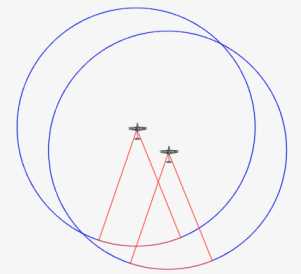
The size of the gap depends mainly on
spacing and the angle the wingman is offset from the lead. They can now
start to seer each other's blind spots, but in the end... there's still
a gap. Regardless, it's a useful formation. Especially when frequent
manoeuvring is involved.
Line
Abreast / Wall

The Line Abreast (or
Wall) formation puts both fighters side by side with decent spacing. In
WW2OL this is typically somewhere between quarter and half circle range.
Any closer and you limit your view coverage, and any farther.... it
becomes difficult to quickly aid your wingman if needed. If you are at
grey circle range, you are far too spread out. The view coverage of the
formation is illustrated below:
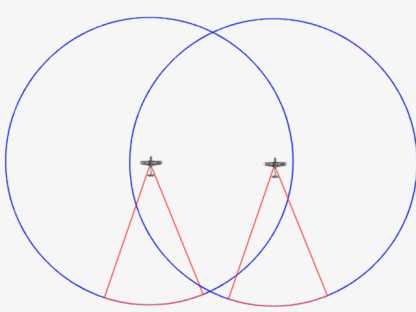
As seen above, nearly
every last bit of airspace around the formation can be easily covered.
Also, the need to bank and weave around is completely eliminated. With
the correct spacing and proper scanning technique, it's going to be next
to impossible for an enemy aircraft to approach unseen. The scanning
technique used is quite simple: Both pilots constantly watch the
airspace around the other pilot. For example, if you were piloting the
right plane in the formation above your primary scanning job (in order
of importance):
- Look left-rear and check
your wingman's six (high and low)
- Look at (and beyond)
your wingman above and below
- Look in front of your
wingman above and below
- Look ahead to see what's in front
of you.
- Repeat
Your secondary and
less-frequent role is to look at the airspace on the other side of
you. Also, if you were leading you might bump #4 up to the top and
the others down one.
Because virtually every
piece of sky around the formation is almost always under surveillance,
it is the best formation for cruising, and is always used here at JG52
in r�tte strength. Care must be taken to not get too close because the
blind spots can overlap and you'll lose view coverage. Again, somewhere
between quarter to half circle range is ideal. The only real downside to
this type of posture is that turning can become somewhat of a nightmare
if pilots aren't well versed in it. It's really not that difficult, and
we'll get to that shortly.
Formation Flying
Formation flying is pretty
simple. It just takes a desire to do so from all involved. It is 50% spacing
and 50% throttle control. That's it. Here, we almost never fly max/max while
cruising around. To do so would make it almost impossible to keep everyone
in position. Wingmen need to be able to speed up and slow down to stay in
position. At max/max... they will eventually fall back, and keep falling
back. With that said, formation flying is not "set it and forget it". You
can't just put the throttle where the leader said and forget about it. You
have to be pro-active, slight speed increases and decreases are necessary to
stay in position..
For Line-Abreast
As stated above,
line-abreast for a 2-plane flight is virtually always the formation of
choice.. so we'll start with that one first. To fly this formation, the
leader sets a conservative power setting (max/1.0 for climb; cont/1.0
for cruise) and the wingman fly's out to the side and puts the leader on
his wingtip. Spacing is somewhere between 1/4 and 1/2 circle range.
During the scanning process the wingman notes the leaders position
relative to his wingtip, and adjusts power as necessary to keep the
leader on/near it. Now that you are setup for optimal view coverage,
wouldn't turning the formation on new headings totally screw it up? Not
really. Through the use of some techniques, you can keep the formation
intact on heading changes.
The most commonly used
method for turning a Line-Abreast (or Wall) formation on arbitrary
headings is the Crossover. Seen below:
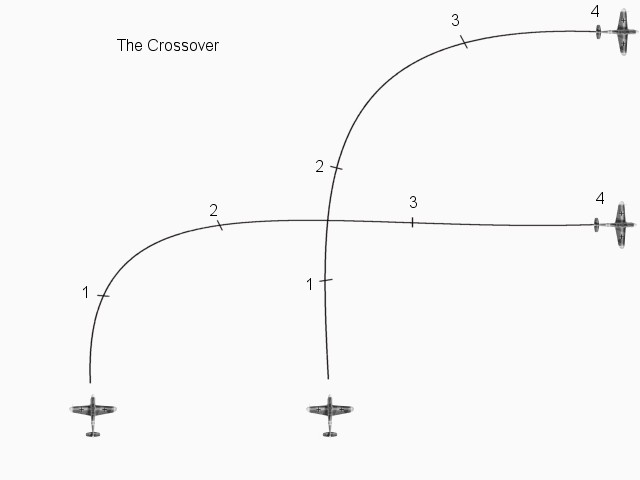
The image above shows a 90 degree crossover turn, initiated with the call
"Cross Right".
NOTE: 'Cross Right',
with no degree or headings specified is always 90 degrees of current
course..
The
fighter on the outside of the formation in relation to the turn starts
his turn first. In the above picture, the left side fighter initiates a
90 degree heading change to the right. The right fighter continues on
the original course and watches the left fighter. When the turning
fighter approaches his 5 o'clock near time "2" in the picture, he starts
his 90 degree turn right. On exit from the manoeuvre the two fighters
will be 90 degrees off the original course in a nearly identical line
abreast formation, but on opposite sides. Here's a flash animation of
it:
Crossover Turn
With the need to watch each other
during execution, visual coverage around the fighters is preserved
throughout this heading change. For small heading changes, it makes more
sense for the wing leader to just make the small turn and the wingman
increase or decrease power as needed to stay in position. But, for turns
up to 45 to 90 degrees, this type of turn is recommended.
For less than 90 degree turns, the guy
on the inside of the turn.. start his turns a little later than he would
for a 90 degree tac turn..If more than 90 degrees needs to be done, its
broken up into two parts.... however, if everyone is on the ball, it can
be done as one fluid movement..
Example Comms:
"Cross Right 45"
- 45 degree heading change to the Right utilizing a Crossover turn..
"Cross Left North"
- Flight is heading North East, turns left 45 degrees to the North.
"Cross Right 60"
- Formation turns to the right 60 degrees.
The Crossover Turn is a general
purpose "Sub 180 degree" turning technique and is extremely useful. It
will be the most commonly used one, so it is best to start learning and
perfecting it early.
For 180 degree turns,
there are a few options. Some have situations where they are very
useful, but beside those circumstances they won't be used a frequently..
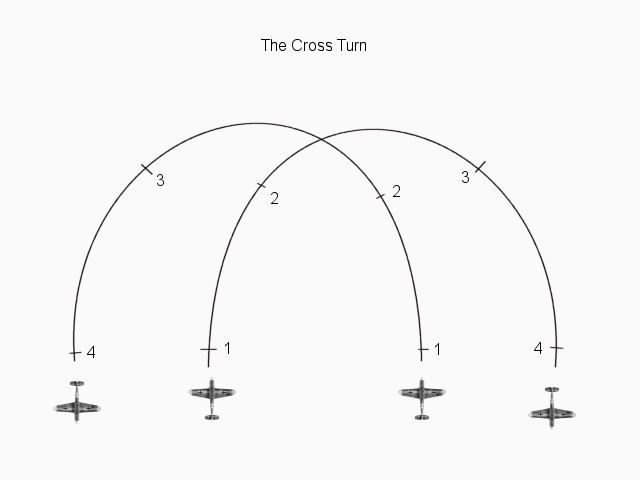
Not to be confused with the Crossover, The Cross turn is a 180 heading
change with both planes turning into each other and exiting in line
abreast. Depending on the initial spacing of the formation, you may or
may not exit with the same spacing as you did going into it. During the
intial phases of the turn, the airspace around the flight is covered
with both pilots looking at each other. The downside is that as they
cross head-on, view coverage is lost temporarily. It can quickly get you
around with the line abreast formation persevered at or near the initial
spacing. As a bonus, depending on how close a bad guy may be, It may
sort of confuse him as to which target to commit to.
Example Comms:
wingman:
contact deep six far out
leader:
copy that, lets swap it around.
(flight does a cross turn and
heads towards the contact.)
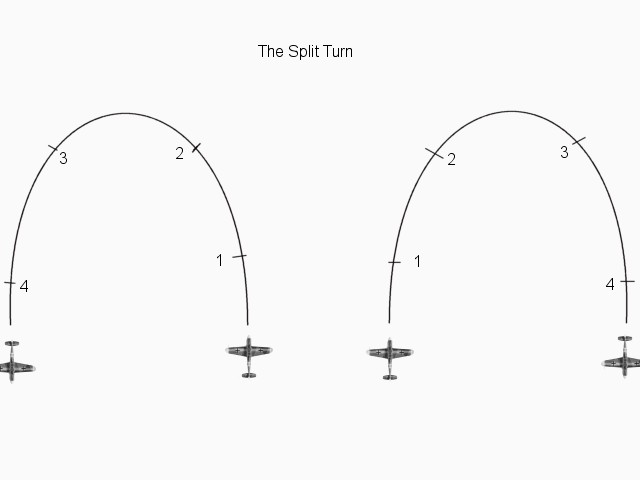
Similar to the cross turn is the split
turn. But instead of turning into each other you turn away. The downside
to this one is the spacing upon exit is allot further than it was going
into it and the pilots lose sight of each other during the turn. It
could be useful if you've got a bad guy back there and you want to
reverse around straight into a bracket on him.. (brackets will be
discussed later).
Example Comms:
wingman:
contact closing in six o'clock level.
leader:
copy, visual, split 180...... bracket.
wingman:
splitting right
(split turn is
initiated
going
straight into a bracketing pincer)
If the bandit is close enough that you
wouldn't be able to pull off a bracket on him... its not a good idea to
do a split turn. One person will be hung out to dry and be under
immediate attack, while the other pilot watches helplessly. In this
situation, you'd want to "Sandwich" the bandit between you. For this
you'd use an in-place turn:
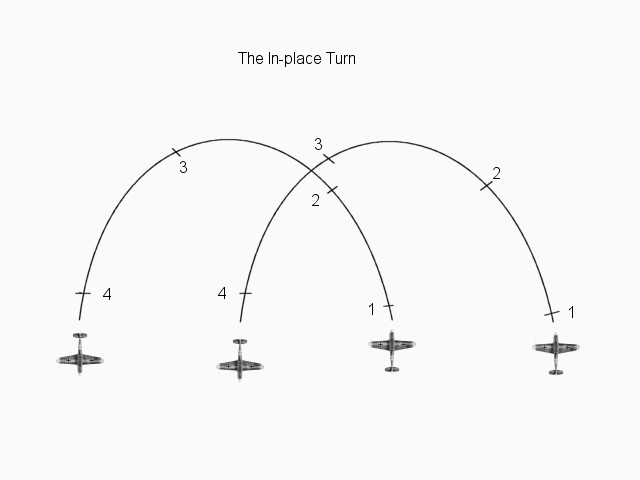
With the in place turn, both planes
turn in the same direction and the formation spacing is held intact.
It's not the 'best' turn for lookout, because 1 pilot will always be
completely obscured underneath the belly of the other. This type of turn
is useful in a few situations. If one fighter is under immediate attack,
an in place type turn starting with the targeted wingman turning away
from the other wingman is useful. The free fighter turns in the same
direction to fall in behind the enemy fighter while the other drags for
him.
Example Call for this:
"Let's Break left/right
180".
The previous methods for turning a
line-abreast formation 180 degrees are perfect for certain situations,
but they wont be used as much as the following one..
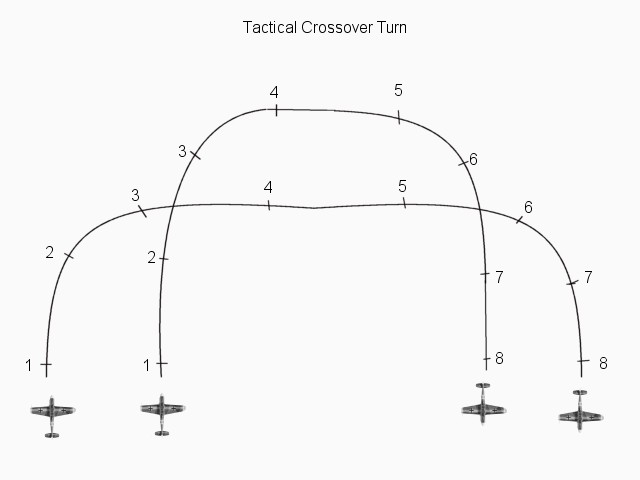
Initiated by calling "Tac Right/Left".
Its basically the same as the
crossover, but done in two parts. It's a continuous fluid movement
though if done right, and it keeps the airspace covered throughout the
turn.
To make this more clear, look at the
inside fighter at Time1 above. As he approaches Time4 he doesn't stop at
the 90 degree mark, but continues his turn (with the same stick
pressure) back into the now "Inside" guy to niate another "Cross Right".
There is no pause at Time4 for him if it is done correctly. The whole
thing looks like one fluid highly orchestrated heading change.
Unless a certain situation may call
for it, Tactical Crossovers (or Tac Turns) will be the most widely used
while flying around, so its best to learn the mechanics of it. They keep
the integrity of the formation, as well as spacing and view coverage
intact if done right.
Combinations of Crossovers and Tac
Turns are used to move the flight from one heading change to another.
The parts should blend in to each seamlessly, and the leader shouldn't
have to spell it out for the wingman all the time.. it should be
understood as standard operating procedure . Say your heading North, and
the leader says lets go Southeast. They start a Cross-Right 90 onto East
then flow seamlessly into a Cross-Right 45 onto Southeast. Starting to
make sense now? Good :P
The Crossover should become learned to
the point where it's second-nature... it's just something you should
always do. And if you DO always do it, you and your wingman should
rarely be surprised while cruising. AND you'll spot more bad guy's that
you wouldn't have otherwise seen in the process if you were flying
alone.
Reforming the Line-Abreast
Now that we know how to turn a
line-abreast etc. It should be noted that there are quick and easy ways to
get into a line-abreast if you have fallen out of it. If you
wingman is lagging behind you off to the right (say 45 degrees for
example)... use what's called a 'Check Turn'. In this instance you'd call a
"Check Right 45". Since a Check (or Break Turn) call is for both of you to
turn simultaneously.. you both turn right 45 degrees at the same time and
voila.. you are now in Line-Abreast. And can easily Initiate a 'Cross-Left
45' to get back onto the original heading.
If you happen to be closer to a
Line-Astern (Trail) formation. Just call a "Check (or break) Right 90". Both
of you turn 90 degrees and voila.. you're in line abreast. Easy as pie.
Attack
Doctrines:
An attack doctrine is
simply a general way of approaching an engagement. The pilots in the
r�tte should be well versed in how and when each should be employed. The
purpose of a defined attack doctrine is to remove the chaos factor
of air-to-air combat. Basically, it's the tendency of engagements to
break up into a chaotic every man for himself series of "1v1's" or "Many
vs. 1's". It leads to confusion not only visually, but mentally as the
comms erupt about many different engagements at one time.
It doesn't take everyone
in a flight of aircraft to kill a bad-guy. For instance, you don't want
(nor need) EVERYONE to jump on a lone bandit, only to get in trouble
when no one was paying attention for incoming enemies. It all revolves
around teamwork.. a recurring theme in this text if you haven't noticed
yet.
In any case, there are 3
basic postures a r�tte can employ in offensive situations: Fighting
Wing, Double Attack, and Loose Deuce. The posture
may change many times in an engagement, but you'll usually be in one of
the above three categories. Knowing each, and the roles each pilot play
in each translates into a coordinated pair that is extremely hard to
beat. First, we'll go over each one. Covering the basics of what/why/how
each is, then we'll get into how they all come together on the virtual
battlefield..
Fighting Wing:
Often called
Welded Wing, it's just two fighters acting as one. Once an
engagement begins, the leader basically just fights the enemy as he
would do if he were alone. The wingman simply follows the leader
throughout the engagement. He doesn't have to fly in a rigid formation,
but from a position further back to keep the leader's six clear, but not
so far out as to not be of assistance quickly. Typically the wingman
fly's in a loose wedge or trail formation behind the
leader. To save myself time (which is limited atm), I'll quote from a
book here and there.
"Fighting wing has
several advantages as compared to operating alone in a combat
environment. One of the greatest pluses is that it takes much less
training for a pilot to fly fighting wing well enough to stay with
his leader than it takes to enable that pilot to survive on his own.
Trained fighter pilots are almost always in short supply during
wartime, and fighting wing allows inexperienced pilots to engage in
combat under the tutelage of a veteran at reduced risk. Actual
combat is the best teacher, but historically the highest attrition
rate for fighter pilots has occurred during their first few combat
missions. Fighting wing can get the fresh recruit through this
vulnerable period while he is serving the useful function of
offering some visual support to the leader. A second set of eyeballs
is invaluable in the combat environment."
**
"The other major advantage of fighting wing is
concentration of fire. The lead is essentially manoeuvring two
firing platforms rather than just one. Under the ground rules of
fighting wing it is the wingman's responsibility to stay with and
cover his lead, not to engage the bogey. Any attention paid to the
opponent detracts from the wingman's defensive potential. Against
most manoeuvring fighter opponents, when concentration of fire is
not critical and shot opportunities are likely to be fleeting, the
leader will usually do the shooting. But quite often an enemy
fighter's defensive reaction to the leader's attack sets up a shot
for the wingman."
**
"In addition to its
obvious benefits, fighting wing doctrine has some serious flaws.
With the exception of the pre-engagement line-abreast formation, the
wingman's position behind the leader results in reduced visual
coverage of the wingman's six. Moreover, once he is engaged, the
lead is likely to be too busy with the bogey to provide adequate
support to his wingman in any event. Although the wingman is
theoretically burned only with defensive lookout responsibility, in
practice he so occupied by maintaining position during hard
manoeuvring that he may be of little defensive value to either the
lead or himself. In this case he is literally "hung out to dry".
Many a wingman has been lost without the leader even being aware of
it."
**
"Lack of offensive
efficiency is also a serious problem with this doctrine. The bogey
pilot is essentially fighting only one opponent. Having one of his
adversaries in sight virtually assures having the other in sight."
**
Double Attack:
Double attack,
contrary to its name, does not mean two fighters attacking at once. The
roles in this doctrine are split between offensive and defensive. One
pilot is engaged and one is free/lookout. The free fighter is above the
fight storing energy, keeping an eye on the engaged fighter, and
watching for new enemies trying to hop into the engagement. The engaged
fighter is attacking the opponent using energy tactics and vertical
manoeuvring. When the engaged fighter is in danger of losing an energy
advantage over his opponent he breaks off to regain his energy and the
free fighter jumps in to take over the fight. Maximum pressure is put on
the bandit, as he never gets a break. Quite often, when the engaged
fighter breaks off he'll be dragging his opponent, who by now is low on
SA and likely won't see the free fighter bearing down on him.
Notice should be given to
the free fighter as far ahead in advance of the engaged pilot breaking
off as possible. This might not always be feasible, but its worth
stating that it gives the free fighter time to setup an optimal attack
(such as a blind side entry - explained later) and to time it with the
engaged fighters exit. This keeps the bandit off edge by not ever
allowing him any room to breathe or to regain energy.
In any event, one pilot
is engaged and one pilot is free keeping a look out. In doing so, it
provides offensive and defensive capabilities to the pair. It's the most
flexible and useful, so its a must to be proficient in it's use. When
double attack doctrine fails to bring a decisive or quick end to an
engagement, a more aggressive approach may be needed......
Loose Deuce
Like double attack, loose
deuce is a coordinated attack with an engaged pilot and a free pilot.
But there is where the similarities end. Unlike double attack which is
split offensively and defensively, loose deuce is all offensive.
Employed right, it should bring a quick and decisive end to the a fight.
This added offensive capability comes at the price of defensive ability,
so it must be used wisely.
As in double attack, one
pilot engages the bandit and one goes up (or stays up) to get energy.
But this time the high guy is not a lookout, he is part of the fight.
The engaged pilot's job is to get his opponent to dump his energy and to
get him predictable. He is not to pursue the bandit so hard that the
bandit becomes erratic or to put himself in danger of losing the
offensive. While this is taking place the free fighter is manoeuvring
above the fight setting up a slashing attack at the proper moment when
the bandit becomes predictable. The most successful attack is a
blind-side entry. Which is from an angle where he is coming in from the
bogey's belly (blind-side).
If the setup is right,
the bandit won't see the free fighter coming in. The free fighter will
be coming into the fight from the side and above with the bandit in a
hard turn away from him (evading the engaged fighter) with his belly
showing. The free fighter will cut into his turn circle unseen and nail
him on the other side of it with a low G, high angle snapshot (the most
deadly kind). I'll explain the blind-side entry further down.
The goal of loose deuce
is to end a fight quickly and get back to a more defensive posture such
as line-abreast. Defensive lookout is lost in loose-deuce, so it must be
used with caution
Variations
Strike-Rejoin-Strike
is a variation on the
fighting wing doctrine.
It's employed when you're outnumbered and have an energy advantage. The
difference is the wingman is free to pick a target as long as he doesn't
have to manoeuvre too far off course. The two slash into the 'bogey
cloud' each attacking a bandit (Strike) .... and then extending
away in the same direction (Rejoin). The two regain their
energy advantage and then return to do it again (Strike). This
is the safest way to deal with lots of enemies hanging around a town
until one of the bogey's can be pulled away from the fight and dealt
with 2v1 with a more aggressive tactic such as double-attack or loose
deuce.
In & Out
is a double attack variation, but a
little more cautious. Instead of one guy going in and fighting till he's
about to lose his energy advantage, the pair takes alternating slashing
(BnZ) attacks. One pilot stays up and keeps an eye out, while one goes
in for an attack run. As the In pilot is climbing out, the
Out pilot rolls in for an attack of his own. At this point, the
roles (and designations) swap. Sometimes, as one is climbing out after a
pass, the victim will try to follow him up for a spray. This is a
perfect setup for the now In fighter. Both versions are
essentially double attack (one free, one engaged). This one has the
added benefit of a bit more defensive ability towards unexpected bogey's
at the cost of less pressure on the engaged bandit. The version or
aggressiveness to use is mainly dependant on the likelyhood of new
bandits or hostility of the airspace you are in.
Sandwiching,
can be used as an offensive attack.
In this use, it could be categorized as loose deuce (both fighters
offensive). It could be employed when the bandit is extremely erratic or
just plain stubborn. You would start it by first taking pressure off him
and letting him settle down. You stay above him and get on opposite
sides then dive on him from two directions. He has to turn to evade an
attack.. but which one? Breaking into one guy shows his six for the
other. You basically sucker him into killing himself. About all he can
do is split-S... if he's smart :)
Brief Summary
Fighting wing is pretty
straightforward. It's great for n00bies, because you don't really have to
teach em much. All they have to do is follow you and do what you do. In
doing so, they have someone close by if they get in trouble, and they
get to see a veteran at work. That in itself can teach them allot. A few
missions of flying as a welded wing can really make a light bulb come on
in their head.
Fighting wing basically
keeps the pair together, a plus in hostile airspace with lots of
possible bad guys (and even more of a plus with icons off servers in
IL2). When you arrive at a scene with lots of enemies and you have an
altitude/energy advantage, you should stick to fighting wing and employ
strike-rejoin-strike tactics until you can isolate a bad-guy from the
fight. When that happens a more direct approach could be employed such
as double-attack or loose deuce.
Double-Attack and Loose
Deuce are somewhat similar, and can sometimes be mistaken for each
other. The best analogy of the difference is a tag-team wrestling match.
Double-Attack would be the standard one guy in the ring fighting and one
guy behind the ropes resting & waiting to be tagged in. Loose-Deuce
would have the guy in the ring distracting the referee and opponent
while the other guy slips in and hits him with a chair.
Most fights will start
out in fighting wing, transition to double-attack, and sometimes end in
loose deuce. So knowing all of the standard doctrines and their use is
pretty important. Variations are sometimes used depending on the
circumstances... but in a 2v1, your run of the mill double-attack or
loose deuce will be the order of the day. Resist the urge to both engage
in prolonged manoeuvring at the start. You may get surprised.
Offensive attack
doctrines are not just limited to a pair of two, they go all the way up
to the schwarm or staffel level. For example, a flight of 4 aircraft
stumble across a lone bad-guy. The flight splits up into two pairs. The
flight as a whole goes into double-attack.. with one pair going in and
the other hanging high to provide lookout. The engaged pair attacks
using loose deuce tactics. If they're unsuccessful or the bandit gets the
advantage over them they break off and call the other pair in. While
they extend above the fight to setup as lookout, the other two engage
using double-attack or loose deuce tactics also. Even with two scharms
the 3 basic attack doctrines could be used. But will get into that stuff
much later in the training site. For now we're just interested in pairs.
Against most fights will
start out in fighting wing, transition to double-attack, and sometimes
end in loose deuce.
Blind-Side Entries
The most effective way to
kill a bandit that is busy fighting is to hang up above him and watch
him. As soon as he gets predictable and you can paint a mental picture
of his turn circle, you can time it so that you are coming in from his
underside unseen and fly to a point where his high six is right in your
crosshairs with minimal G and point blank range. Other than an
explanation of it, all i can offer at the moment is this crappy picture
(i hope to get a video of it soon):
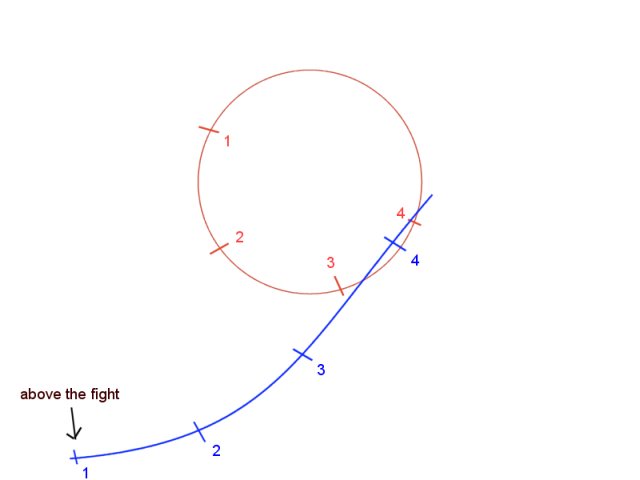
Note: the blue
fighter is above and off to the side of the fight slightly. Notice
how at time 1 he times his roll in when the bandit is coming around
his turn and is pointing at him.
Depending
on how high or far away you start, you may need to dive in
earlier - takes practice. As a general rule of thumb, go in
when he's pointing at you.
As he is coming in at
time 2 he is obscured from view from the bandit's wing and belly. At
time 3 the bandit's six o'clock should start to be showing and the
fighter should be almost in guns range. He then gently cuts inside
the bandit and drives in to a point where the bandit will be
slightly cutting across his gun sight at close range. This produces a
minimal G, high angle, low deflection shot. A lethal combo, as it
puts the rounds in the front of the plane with a high concentration
due to the low G and low deflection needed. I hope to start
recording again soon and have a more clear example with a video for
you.
This type of setup is
ALWAYS useful, even when flying alone and you see a spit and a
friendly circle jerking. Hang high, watch em, and then time a nice
blind-side pwnage entry. In this situation, watch the friendly plane
to help with prediction, because the spit will be going whoever he's
going. Allot of times, flying an intercept course on the friendly
will put the spit right in your sights. :)
Air Combat Manoeuvres Continued part 1...
Introduction (Thanks to Gutted of JG52 for this great information)
The R�tte is the smallest and most basic form of the entire system. Understanding the r�tte is critical, because higher levels of organization and tactics are layered on top of it. The r�tte consists of two aircraft. One leader, and one wingman. During the course of the mission, they may swap roles... but at any one time there is one leader and one wingman. Often times, one will be a 'mission-wide' lead, with temporary control being given to the wingman at certain times during the mission... and this is highly encouraged.
To be honest, if a leader doesn't temporarily swap roles with his wingman enough he is scoffed at. No one wants to sit in the backseat all the time watching the driver have all the fun. If you are leading, and you get a quick bounce-kill on a lone enemy.. consider handing your wingman the lead for a short time while you cover him for the next one. Basically, to make flying in this manner worthwhile.. the two of you should have equal opportunity. The buck doesn't stop there though. When we get to offensive tactics, you'll really begin to see why having two planes are better than one... and why being a wingman is not as bad as it sounds. Before we get there though, we need to talk about how a r�tte flying by itself should cruise around the battlefield.. so as to not become a fiery mess before they ever get to employ those tactics..
Formations
It's a dangerous sky we fly in. In a matter of seconds you can go from cruising giggling with your wingman, to having him going down screaming in a ball of flames. We fly together for mutual protection and to have more eyeballs scanning the sky looking for danger. Unless the proper formations are flown though, you aren't allowing yourself any of the benefits of flying as a pair. Lets have a look at the problem at hand:
Flying along you by yourself you are very vulnerable. As you can see from above you have a nasty blind spot behind you. Also, you cant see what's under you, below your nose, or what's under your wings. To keep this airspace under surveillance you'd have to roll and do small check turns and look all over the place. You can't possible keep the air around you completely covered at all times. Bad guys can and will sneak in on you to ruin your day. That's why having another set of eyeballs is so important. But, it does no good if that wingman doesn't form on you in a manner that helps.
There are three basic formations a r�tte can be in: Line Astern (or Trail), Echelon (Wedge), or Line Abreast (Wall). We'll run down them and see what each have to offer:
Line Astern / Trail
The all too common 'follow the leader' formation..... also called "Idiot File" by the Germans in WWII. There's so many things wrong with this that it's not funny. Yet, in our virtual skies you see it allot. The leader cannot see the wingman's six, and in the position the wingman is in.. he's only watching what is immediately between the two of them.. The wingman may as well just be sitting in the leader's plane with him, because this formation does absolutely no good in terms of lookout. Here's what each pilot can see in this formation:
To make the situation even more dreadful is that if an enemy were to sneak in on these two guys, he can take them both out in a single pass. I've seen it done to people, and I've done it to others. For fighters on patrol, this is suicide.
Echelon / Wedge
The wedge is basically just an echelon (staggered formation) with just two planes. Add in more than two aircraft and you'll call it an echelon. The wingman is still behind the leader here, but he's offset to the side ~45 to 60 degrees with decent spacing so the lead can clearly see him.. With just a quick turn of the head, the lead should be able to quickly and easily see the wingman in this formation. If he can't you aren't position right. There are still some gaps however, as seen below:
The size of the gap depends mainly on spacing and the angle the wingman is offset from the lead. They can now start to seer each other's blind spots, but in the end... there's still a gap. Regardless, it's a useful formation. Especially when frequent manoeuvring is involved.
Line Abreast / Wall
The Line Abreast (or Wall) formation puts both fighters side by side with decent spacing. In WW2OL this is typically somewhere between quarter and half circle range. Any closer and you limit your view coverage, and any farther.... it becomes difficult to quickly aid your wingman if needed. If you are at grey circle range, you are far too spread out. The view coverage of the formation is illustrated below:
As seen above, nearly every last bit of airspace around the formation can be easily covered. Also, the need to bank and weave around is completely eliminated. With the correct spacing and proper scanning technique, it's going to be next to impossible for an enemy aircraft to approach unseen. The scanning technique used is quite simple: Both pilots constantly watch the airspace around the other pilot. For example, if you were piloting the right plane in the formation above your primary scanning job (in order of importance):
- Look left-rear and check your wingman's six (high and low)
- Look at (and beyond) your wingman above and below
- Look in front of your wingman above and below
- Look ahead to see what's in front of you.
- Repeat
Your secondary and less-frequent role is to look at the airspace on the other side of you. Also, if you were leading you might bump #4 up to the top and the others down one.
Because virtually every piece of sky around the formation is almost always under surveillance, it is the best formation for cruising, and is always used here at JG52 in r�tte strength. Care must be taken to not get too close because the blind spots can overlap and you'll lose view coverage. Again, somewhere between quarter to half circle range is ideal. The only real downside to this type of posture is that turning can become somewhat of a nightmare if pilots aren't well versed in it. It's really not that difficult, and we'll get to that shortly.
Formation Flying
Formation flying is pretty simple. It just takes a desire to do so from all involved. It is 50% spacing and 50% throttle control. That's it. Here, we almost never fly max/max while cruising around. To do so would make it almost impossible to keep everyone in position. Wingmen need to be able to speed up and slow down to stay in position. At max/max... they will eventually fall back, and keep falling back. With that said, formation flying is not "set it and forget it". You can't just put the throttle where the leader said and forget about it. You have to be pro-active, slight speed increases and decreases are necessary to stay in position..
For Line-Abreast
As stated above, line-abreast for a 2-plane flight is virtually always the formation of choice.. so we'll start with that one first. To fly this formation, the leader sets a conservative power setting (max/1.0 for climb; cont/1.0 for cruise) and the wingman fly's out to the side and puts the leader on his wingtip. Spacing is somewhere between 1/4 and 1/2 circle range. During the scanning process the wingman notes the leaders position relative to his wingtip, and adjusts power as necessary to keep the leader on/near it. Now that you are setup for optimal view coverage, wouldn't turning the formation on new headings totally screw it up? Not really. Through the use of some techniques, you can keep the formation intact on heading changes.
The most commonly used method for turning a Line-Abreast (or Wall) formation on arbitrary headings is the Crossover. Seen below:

The image above shows a 90 degree crossover turn, initiated with the call
"Cross Right".
NOTE: 'Cross Right', with no degree or headings specified is always 90 degrees of current course..
The fighter on the outside of the formation in relation to the turn starts his turn first. In the above picture, the left side fighter initiates a 90 degree heading change to the right. The right fighter continues on the original course and watches the left fighter. When the turning fighter approaches his 5 o'clock near time "2" in the picture, he starts his 90 degree turn right. On exit from the manoeuvre the two fighters will be 90 degrees off the original course in a nearly identical line abreast formation, but on opposite sides. Here's a flash animation of it:
With the need to watch each other during execution, visual coverage around the fighters is preserved throughout this heading change. For small heading changes, it makes more sense for the wing leader to just make the small turn and the wingman increase or decrease power as needed to stay in position. But, for turns up to 45 to 90 degrees, this type of turn is recommended.
For less than 90 degree turns, the guy on the inside of the turn.. start his turns a little later than he would for a 90 degree tac turn..If more than 90 degrees needs to be done, its broken up into two parts.... however, if everyone is on the ball, it can be done as one fluid movement..
Example Comms:
"Cross Right 45" - 45 degree heading change to the Right utilizing a Crossover turn..
"Cross Left North" - Flight is heading North East, turns left 45 degrees to the North.
"Cross Right 60" - Formation turns to the right 60 degrees.
The Crossover Turn is a general purpose "Sub 180 degree" turning technique and is extremely useful. It will be the most commonly used one, so it is best to start learning and perfecting it early.
For 180 degree turns, there are a few options. Some have situations where they are very useful, but beside those circumstances they won't be used a frequently..

Not to be confused with the Crossover, The Cross turn is a 180 heading
change with both planes turning into each other and exiting in line
abreast. Depending on the initial spacing of the formation, you may or
may not exit with the same spacing as you did going into it. During the
intial phases of the turn, the airspace around the flight is covered
with both pilots looking at each other. The downside is that as they
cross head-on, view coverage is lost temporarily. It can quickly get you
around with the line abreast formation persevered at or near the initial
spacing. As a bonus, depending on how close a bad guy may be, It may
sort of confuse him as to which target to commit to.
Example Comms:
wingman: contact deep six far out
leader: copy that, lets swap it around.
(flight does a cross turn and heads towards the contact.)

Similar to the cross turn is the split turn. But instead of turning into each other you turn away. The downside to this one is the spacing upon exit is allot further than it was going into it and the pilots lose sight of each other during the turn. It could be useful if you've got a bad guy back there and you want to reverse around straight into a bracket on him.. (brackets will be discussed later).
Example Comms:
wingman: contact closing in six o'clock level.
leader: copy, visual, split 180...... bracket.
wingman: splitting right
(split turn is initiated going straight into a bracketing pincer)
If the bandit is close enough that you wouldn't be able to pull off a bracket on him... its not a good idea to do a split turn. One person will be hung out to dry and be under immediate attack, while the other pilot watches helplessly. In this situation, you'd want to "Sandwich" the bandit between you. For this you'd use an in-place turn:

With the in place turn, both planes turn in the same direction and the formation spacing is held intact. It's not the 'best' turn for lookout, because 1 pilot will always be completely obscured underneath the belly of the other. This type of turn is useful in a few situations. If one fighter is under immediate attack, an in place type turn starting with the targeted wingman turning away from the other wingman is useful. The free fighter turns in the same direction to fall in behind the enemy fighter while the other drags for him.
Example Call for this:
"Let's Break left/right 180".
The previous methods for turning a line-abreast formation 180 degrees are perfect for certain situations, but they wont be used as much as the following one..

Initiated by calling "Tac Right/Left".
Its basically the same as the crossover, but done in two parts. It's a continuous fluid movement though if done right, and it keeps the airspace covered throughout the turn.
To make this more clear, look at the inside fighter at Time1 above. As he approaches Time4 he doesn't stop at the 90 degree mark, but continues his turn (with the same stick pressure) back into the now "Inside" guy to niate another "Cross Right". There is no pause at Time4 for him if it is done correctly. The whole thing looks like one fluid highly orchestrated heading change.
Unless a certain situation may call for it, Tactical Crossovers (or Tac Turns) will be the most widely used while flying around, so its best to learn the mechanics of it. They keep the integrity of the formation, as well as spacing and view coverage intact if done right.
Combinations of Crossovers and Tac Turns are used to move the flight from one heading change to another. The parts should blend in to each seamlessly, and the leader shouldn't have to spell it out for the wingman all the time.. it should be understood as standard operating procedure . Say your heading North, and the leader says lets go Southeast. They start a Cross-Right 90 onto East then flow seamlessly into a Cross-Right 45 onto Southeast. Starting to make sense now? Good :P
The Crossover should become learned to the point where it's second-nature... it's just something you should always do. And if you DO always do it, you and your wingman should rarely be surprised while cruising. AND you'll spot more bad guy's that you wouldn't have otherwise seen in the process if you were flying alone.
Reforming the Line-Abreast
Now that we know how to turn a line-abreast etc. It should be noted that there are quick and easy ways to get into a line-abreast if you have fallen out of it. If you wingman is lagging behind you off to the right (say 45 degrees for example)... use what's called a 'Check Turn'. In this instance you'd call a "Check Right 45". Since a Check (or Break Turn) call is for both of you to turn simultaneously.. you both turn right 45 degrees at the same time and voila.. you are now in Line-Abreast. And can easily Initiate a 'Cross-Left 45' to get back onto the original heading.
If you happen to be closer to a Line-Astern (Trail) formation. Just call a "Check (or break) Right 90". Both of you turn 90 degrees and voila.. you're in line abreast. Easy as pie.
Attack Doctrines:
An attack doctrine is simply a general way of approaching an engagement. The pilots in the r�tte should be well versed in how and when each should be employed. The purpose of a defined attack doctrine is to remove the chaos factor of air-to-air combat. Basically, it's the tendency of engagements to break up into a chaotic every man for himself series of "1v1's" or "Many vs. 1's". It leads to confusion not only visually, but mentally as the comms erupt about many different engagements at one time.
It doesn't take everyone in a flight of aircraft to kill a bad-guy. For instance, you don't want (nor need) EVERYONE to jump on a lone bandit, only to get in trouble when no one was paying attention for incoming enemies. It all revolves around teamwork.. a recurring theme in this text if you haven't noticed yet.
In any case, there are 3 basic postures a r�tte can employ in offensive situations: Fighting Wing, Double Attack, and Loose Deuce. The posture may change many times in an engagement, but you'll usually be in one of the above three categories. Knowing each, and the roles each pilot play in each translates into a coordinated pair that is extremely hard to beat. First, we'll go over each one. Covering the basics of what/why/how each is, then we'll get into how they all come together on the virtual battlefield..
Fighting Wing:
Often called Welded Wing, it's just two fighters acting as one. Once an engagement begins, the leader basically just fights the enemy as he would do if he were alone. The wingman simply follows the leader throughout the engagement. He doesn't have to fly in a rigid formation, but from a position further back to keep the leader's six clear, but not so far out as to not be of assistance quickly. Typically the wingman fly's in a loose wedge or trail formation behind the leader. To save myself time (which is limited atm), I'll quote from a book here and there.
"Fighting wing has several advantages as compared to operating alone in a combat environment. One of the greatest pluses is that it takes much less training for a pilot to fly fighting wing well enough to stay with his leader than it takes to enable that pilot to survive on his own. Trained fighter pilots are almost always in short supply during wartime, and fighting wing allows inexperienced pilots to engage in combat under the tutelage of a veteran at reduced risk. Actual combat is the best teacher, but historically the highest attrition rate for fighter pilots has occurred during their first few combat missions. Fighting wing can get the fresh recruit through this vulnerable period while he is serving the useful function of offering some visual support to the leader. A second set of eyeballs is invaluable in the combat environment." **
"The other major advantage of fighting wing is concentration of fire. The lead is essentially manoeuvring two firing platforms rather than just one. Under the ground rules of fighting wing it is the wingman's responsibility to stay with and cover his lead, not to engage the bogey. Any attention paid to the opponent detracts from the wingman's defensive potential. Against most manoeuvring fighter opponents, when concentration of fire is not critical and shot opportunities are likely to be fleeting, the leader will usually do the shooting. But quite often an enemy fighter's defensive reaction to the leader's attack sets up a shot for the wingman." **
"In addition to its obvious benefits, fighting wing doctrine has some serious flaws. With the exception of the pre-engagement line-abreast formation, the wingman's position behind the leader results in reduced visual coverage of the wingman's six. Moreover, once he is engaged, the lead is likely to be too busy with the bogey to provide adequate support to his wingman in any event. Although the wingman is theoretically burned only with defensive lookout responsibility, in practice he so occupied by maintaining position during hard manoeuvring that he may be of little defensive value to either the lead or himself. In this case he is literally "hung out to dry". Many a wingman has been lost without the leader even being aware of it." **
"Lack of offensive efficiency is also a serious problem with this doctrine. The bogey pilot is essentially fighting only one opponent. Having one of his adversaries in sight virtually assures having the other in sight." **
Double Attack:
Double attack, contrary to its name, does not mean two fighters attacking at once. The roles in this doctrine are split between offensive and defensive. One pilot is engaged and one is free/lookout. The free fighter is above the fight storing energy, keeping an eye on the engaged fighter, and watching for new enemies trying to hop into the engagement. The engaged fighter is attacking the opponent using energy tactics and vertical manoeuvring. When the engaged fighter is in danger of losing an energy advantage over his opponent he breaks off to regain his energy and the free fighter jumps in to take over the fight. Maximum pressure is put on the bandit, as he never gets a break. Quite often, when the engaged fighter breaks off he'll be dragging his opponent, who by now is low on SA and likely won't see the free fighter bearing down on him.
Notice should be given to the free fighter as far ahead in advance of the engaged pilot breaking off as possible. This might not always be feasible, but its worth stating that it gives the free fighter time to setup an optimal attack (such as a blind side entry - explained later) and to time it with the engaged fighters exit. This keeps the bandit off edge by not ever allowing him any room to breathe or to regain energy.
In any event, one pilot is engaged and one pilot is free keeping a look out. In doing so, it provides offensive and defensive capabilities to the pair. It's the most flexible and useful, so its a must to be proficient in it's use. When double attack doctrine fails to bring a decisive or quick end to an engagement, a more aggressive approach may be needed......
Loose Deuce
Like double attack, loose deuce is a coordinated attack with an engaged pilot and a free pilot. But there is where the similarities end. Unlike double attack which is split offensively and defensively, loose deuce is all offensive. Employed right, it should bring a quick and decisive end to the a fight. This added offensive capability comes at the price of defensive ability, so it must be used wisely.
As in double attack, one pilot engages the bandit and one goes up (or stays up) to get energy. But this time the high guy is not a lookout, he is part of the fight. The engaged pilot's job is to get his opponent to dump his energy and to get him predictable. He is not to pursue the bandit so hard that the bandit becomes erratic or to put himself in danger of losing the offensive. While this is taking place the free fighter is manoeuvring above the fight setting up a slashing attack at the proper moment when the bandit becomes predictable. The most successful attack is a blind-side entry. Which is from an angle where he is coming in from the bogey's belly (blind-side).
If the setup is right, the bandit won't see the free fighter coming in. The free fighter will be coming into the fight from the side and above with the bandit in a hard turn away from him (evading the engaged fighter) with his belly showing. The free fighter will cut into his turn circle unseen and nail him on the other side of it with a low G, high angle snapshot (the most deadly kind). I'll explain the blind-side entry further down.
The goal of loose deuce is to end a fight quickly and get back to a more defensive posture such as line-abreast. Defensive lookout is lost in loose-deuce, so it must be used with caution
Variations
Strike-Rejoin-Strike is a variation on the fighting wing doctrine. It's employed when you're outnumbered and have an energy advantage. The difference is the wingman is free to pick a target as long as he doesn't have to manoeuvre too far off course. The two slash into the 'bogey cloud' each attacking a bandit (Strike) .... and then extending away in the same direction (Rejoin). The two regain their energy advantage and then return to do it again (Strike). This is the safest way to deal with lots of enemies hanging around a town until one of the bogey's can be pulled away from the fight and dealt with 2v1 with a more aggressive tactic such as double-attack or loose deuce.
In & Out is a double attack variation, but a little more cautious. Instead of one guy going in and fighting till he's about to lose his energy advantage, the pair takes alternating slashing (BnZ) attacks. One pilot stays up and keeps an eye out, while one goes in for an attack run. As the In pilot is climbing out, the Out pilot rolls in for an attack of his own. At this point, the roles (and designations) swap. Sometimes, as one is climbing out after a pass, the victim will try to follow him up for a spray. This is a perfect setup for the now In fighter. Both versions are essentially double attack (one free, one engaged). This one has the added benefit of a bit more defensive ability towards unexpected bogey's at the cost of less pressure on the engaged bandit. The version or aggressiveness to use is mainly dependant on the likelyhood of new bandits or hostility of the airspace you are in.
Sandwiching, can be used as an offensive attack. In this use, it could be categorized as loose deuce (both fighters offensive). It could be employed when the bandit is extremely erratic or just plain stubborn. You would start it by first taking pressure off him and letting him settle down. You stay above him and get on opposite sides then dive on him from two directions. He has to turn to evade an attack.. but which one? Breaking into one guy shows his six for the other. You basically sucker him into killing himself. About all he can do is split-S... if he's smart :)
Brief Summary
Fighting wing is pretty straightforward. It's great for n00bies, because you don't really have to teach em much. All they have to do is follow you and do what you do. In doing so, they have someone close by if they get in trouble, and they get to see a veteran at work. That in itself can teach them allot. A few missions of flying as a welded wing can really make a light bulb come on in their head.
Fighting wing basically keeps the pair together, a plus in hostile airspace with lots of possible bad guys (and even more of a plus with icons off servers in IL2). When you arrive at a scene with lots of enemies and you have an altitude/energy advantage, you should stick to fighting wing and employ strike-rejoin-strike tactics until you can isolate a bad-guy from the fight. When that happens a more direct approach could be employed such as double-attack or loose deuce.
Double-Attack and Loose Deuce are somewhat similar, and can sometimes be mistaken for each other. The best analogy of the difference is a tag-team wrestling match. Double-Attack would be the standard one guy in the ring fighting and one guy behind the ropes resting & waiting to be tagged in. Loose-Deuce would have the guy in the ring distracting the referee and opponent while the other guy slips in and hits him with a chair.
Most fights will start out in fighting wing, transition to double-attack, and sometimes end in loose deuce. So knowing all of the standard doctrines and their use is pretty important. Variations are sometimes used depending on the circumstances... but in a 2v1, your run of the mill double-attack or loose deuce will be the order of the day. Resist the urge to both engage in prolonged manoeuvring at the start. You may get surprised.
Offensive attack doctrines are not just limited to a pair of two, they go all the way up to the schwarm or staffel level. For example, a flight of 4 aircraft stumble across a lone bad-guy. The flight splits up into two pairs. The flight as a whole goes into double-attack.. with one pair going in and the other hanging high to provide lookout. The engaged pair attacks using loose deuce tactics. If they're unsuccessful or the bandit gets the advantage over them they break off and call the other pair in. While they extend above the fight to setup as lookout, the other two engage using double-attack or loose deuce tactics also. Even with two scharms the 3 basic attack doctrines could be used. But will get into that stuff much later in the training site. For now we're just interested in pairs.
Against most fights will start out in fighting wing, transition to double-attack, and sometimes end in loose deuce.
Blind-Side Entries
The most effective way to kill a bandit that is busy fighting is to hang up above him and watch him. As soon as he gets predictable and you can paint a mental picture of his turn circle, you can time it so that you are coming in from his underside unseen and fly to a point where his high six is right in your crosshairs with minimal G and point blank range. Other than an explanation of it, all i can offer at the moment is this crappy picture (i hope to get a video of it soon):

Note: the blue fighter is above and off to the side of the fight slightly. Notice how at time 1 he times his roll in when the bandit is coming around his turn and is pointing at him.
Depending on how high or far away you start, you may need to dive in earlier - takes practice. As a general rule of thumb, go in when he's pointing at you.
As he is coming in at time 2 he is obscured from view from the bandit's wing and belly. At time 3 the bandit's six o'clock should start to be showing and the fighter should be almost in guns range. He then gently cuts inside the bandit and drives in to a point where the bandit will be slightly cutting across his gun sight at close range. This produces a minimal G, high angle, low deflection shot. A lethal combo, as it puts the rounds in the front of the plane with a high concentration due to the low G and low deflection needed. I hope to start recording again soon and have a more clear example with a video for you.
This type of setup is ALWAYS useful, even when flying alone and you see a spit and a friendly circle jerking. Hang high, watch em, and then time a nice blind-side pwnage entry. In this situation, watch the friendly plane to help with prediction, because the spit will be going whoever he's going. Allot of times, flying an intercept course on the friendly will put the spit right in your sights. :)
